Profile
Parent element name: hill
Element name: profile
A profile is a continuous function that can be described as a Y(X) (when used as refy) or a Z(X) (when used as refz) function where both X and Y are axes. They are the most important point when creating custom hill constructions. They allow the creation of such buildings as wind grids, towers, and more advanced things.
TIP
This section of the documentation contains things, that can't be described using only words. The best way to test the parameters described below is to use elements from already existing hills and play with them.
Starting with profiles
The root element of the profile is the profile. It takes up to five attributes.
| Name | Type | Allowed values | Description | Optional |
|---|---|---|---|---|
| id | String | A profile name | ||
| side | String | left, right | Placement in terms of refx | True |
| maxstep | +Float | A profile linear points max interval length | True | |
| maxturn | +Float | A profile nonlinear points max interval length | True | |
| refx | String | A reference to the X-axis, which profile is based on | True |
TIP
Maxstep can be understood as the max length of subelements, which create linear elements. The smaller the maxstep value is, the linear elements are split into smaller elements not longer than the maxstep value. It's not usually required to adjust the maxstep. One of the cases, when you can adjust it, might be better-looking spot lights.
TIP
Maxturn attribute can be understood as max chord length of curved lines. The smaller the maxturn value is, the smoother the profile is, but more vertices and faces are rendered.
TIP
If you defined the refx attribute in this element, all children will have the same reference to the refx attribute (until you overwrite this in the child element).
Children elements
TIP
In your defined profile you don't need to use all of the below elements. The only use of the start element and one of other elements (line, polynom3, arc, or profile) is required. line, polynom3, arc, or profile elements can be used multiple times.
Start
Parent element name: profile
Element name: start
The starting point of every profile is the start element.
| Name | Type | Description | Optional |
|---|---|---|---|
| x | Float | The starting point in position relative to the X-axis | |
| y | Float | The starting point in position relative to the Y-axis | |
| refx | String | A reference to the X-axis, which profile is based on | True |
| refy | String | A reference to the Y-axis, which profile is based on | True |
| refyx | Float | A reference to X-point, which Y-point (from y attribute) is based on | True |
WARNING
If you don't define the ref[x, y] attribute, the point position is based on the corresponding axis (X or Y) of the global coordinate system. In some cases, this may be the desired action. You can find more information about the global coordinate system in the Arc section.
Line
Parent element name: profile
Element name: line
The next points can be defined using the line element. As the profile is continuous, the start and lines will be connected in defined coordinates.
TIP
refyx attribute can be used to create surfaces that are not parallel to the refy. You have to set the refyx attribute value equal to the x attribute value from the previous element.
| Name | Type | Description | Optional |
|---|---|---|---|
| x | Float | The next point in position relative to the X-axis | |
| y | Float | The next point in position relative to the Y-axis | |
| refx | String | A reference to the X-axis, which profile is based on | True |
| refy | String | A reference to the Y-axis, which profile is based on | True |
| refyx | Float | A reference to X-point, which Y-point (from y attribute) is based on | True |
| corner | Boolean | Toggles better corner rendering at this point | True |
Polynom3
Parent element name: profile
Element name: polynom3
The next points can also be reached using more sophisticated ways e.g. with polynom3. Polynom3 element describes a third-degree polynomial.
TIP
polynom3 attribute can be described using maths. Let's suppose you have the following third-degree polynomial and two points x0 and x1.
f(x) = ax^3 + bx^2 + cx + d
Let's take a derivative from it.
f'(x) = 3ax^2 + 2bx + c
then
k1 = f'(x0)k2 = f'(x1)
In most cases, you don't need to use mathematical equations of polynom3 and its derivatives. Usually, a simple adjustment of x, y, k1, and k2 attributes is enough.
| Name | Type | Description | Optional |
|---|---|---|---|
| x | Float | The next point in position relative to the X-axis | |
| y | Float | The next point in position relative to the Y-axis | |
| k1 | Float | First derivative at the start of polynom3 | True |
| k2 | Float | First derivative at the end of polynom3 | |
| refx | String | A reference to the X-axis, which profile is based on | True |
| refy | String | A reference to the Y-axis, which profile is based on | True |
| refyx | Float | A reference to X-point, which Y-point (from y attribute) is based on | True |
TIP
The start of polynom3 means the end point of the previous element.
TIP
If you don't define the k1 attribute, polynom3 will continue the previous element at the starting point.
Profile
Parent element name: profile
Element name: profile
Your defined profile can also contain build-in or your other predefined profiles.
| Name | Type | Description | Optional |
|---|---|---|---|
| id | String | A profile name | |
| x | Float | The end point of profile in position relative to the X-axis | True |
| y | Float | A profile shift in position relative to the Y-axis | True |
| n | Float | A profile shift in position perpendicular (using normal vectors) relative to this profile | True |
| dx | Float | A profile shift in position relative to the X-axis | True |
| refx | String | A reference to the X-axis, which X-point (from x attribute) is based on | True |
WARNING
Profile, by default, is shifted in position relative to Y-axis to match the previously used element. y and n attributes apply to this default shift.
TIP
The term "end point of profile" means the end point of use of the given profile, not the end point of this profile in general.
Arc
Parent element name: profile
Element name: arc
Arc element defines the arc that is part of a circle. It can be used e.g. to create elements that can't be created by beams.
| Name | Type | Description | Optional |
|---|---|---|---|
| x | Float | The next point in position relative to the X-axis | |
| y | Float | The next point in position relative to the Y-axis | |
| x0 | Float | The center point of the circle in position relative to X0-axis | |
| y0 | Float | The center point of the circle in position relative to Y0-axis | |
| refx | String | A reference to the X-axis, which profile is based on | True |
| refy | String | A reference to the Y-axis, which profile is based on | True |
| refyx | Float | A reference to X-point, which Y-point (from y attribute) is based on | True |
WARNING
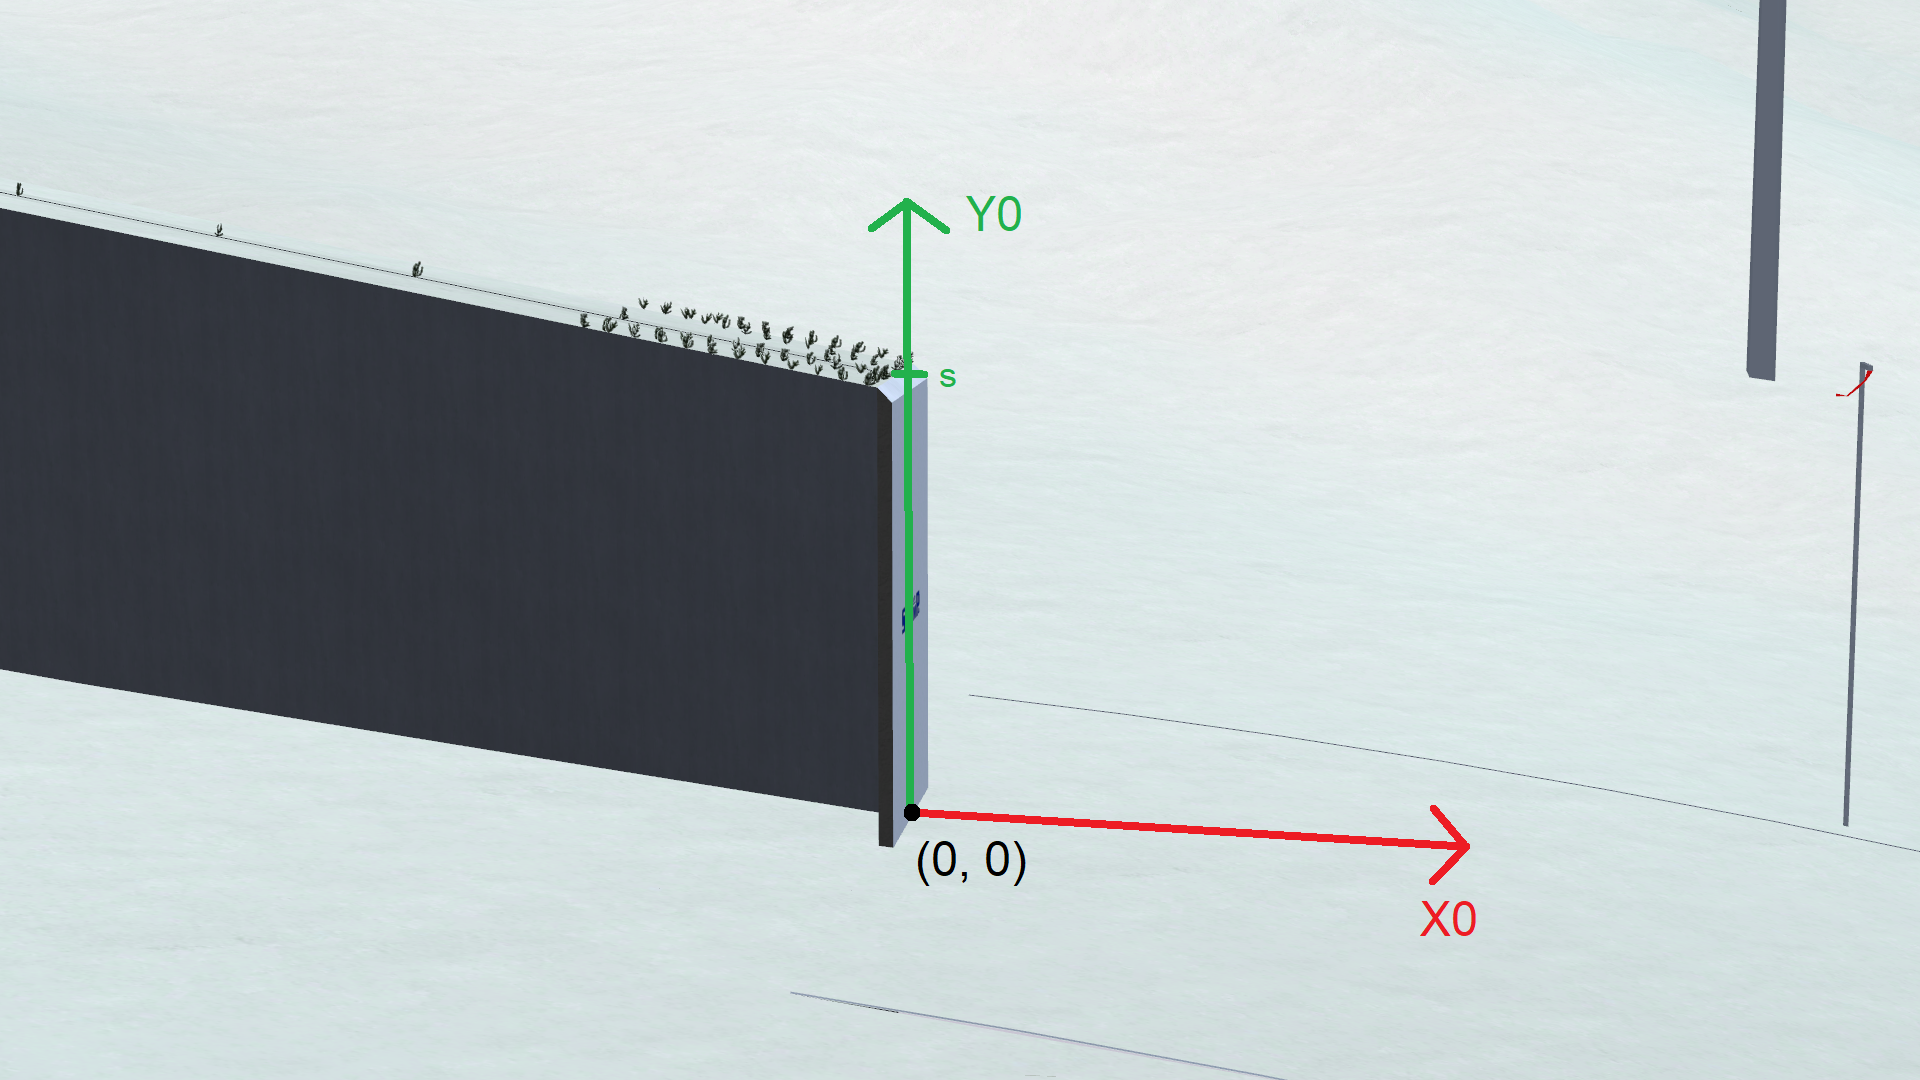
[x, y]0-axis are the axis of the global coordinates system. You can't change its reference.
TIP
The origin of the global coordinates system is located under the center of the take-off as shown in the picture.
Required profiles
There are two required profiles that you have to define by yourself, without them, your hill won't load.
| Name | Placement |
|---|---|
| inrun-left | The left side of the inrun |
| inrun-right | The right side of the inrun |
Built-in profiles
DSJ4 already includes some predefined profiles, that can be used to create basic constructions.
| Name | Placement | Applies for |
|---|---|---|
| dhill | The whole hill | refx |
| dhill-left | The left side of the downhill | refz, ref[l, r]z |
| dhill-right | The right side of the downhill | refz, ref[l, r]z |
| dhill-top | The top side of the downhill | refy, [b, t]refy |
| inrun | The whole inrun | refx |
| inrun-top | The top side of the inrun | refy, [b, t]refy |
| terrain | The terrain | refy, [b, t]refy |
Overridable profiles
These profiles are also built-in, however, you have to specify their start and line elements, otherwise, the game won't include them.
TIP
inrun-extension profile example usage can be seen on Bischofshofen HS140 hill.
TIP
For inrun-terrain and dhill-terrain profiles, reference navigate to the Terrain section.
| Name | Description |
|---|---|
| inrun-extension | Collision area after the ending of the inrun |
| inrun-terrain | Terrain at the inrun |
| dhill-terrain | Terrain at the downhill |
| inrun-left-guard | The left side of the inrun |
| inrun-right-guard | The right side of the inrun |
Code snippets
<!-- The most basic irnun-left profile definition -->
<profile id="inrun-left" side="left" maxstep="1000">
    <start x="-10" y="1.0" refx="inrun" />
    <line x="0" y="1.0" refx="dhill" />
</profile>
<!-- The most basic irnun-right profile definition -->
<profile id="inrun-right" side="right" maxstep="1000">
    <start x="-10" y="-1.0" refx="inrun" />
    <line x="0" y="-1.0" refx="dhill" />
</profile>
<!-- The inrun-extension profile code taken from Bischofshofen HS140 hill -->
<profile id="inrun-extension">
    <start x="0" y="4" />
    <line x="3" y="3.42757" />
    <line x="3.1" y="3" />
</profile>