Tutorial
In this tutorial, we will do working K120/HS134 hill with basic hill constructions.
Requirements
- your favorite text editor
- some time
Starting off
Go to the Documents folder, find Deluxe Ski Jump 4 folder, then go to Custom Hills directory and create a file named Example-HS134-POL.xml.
TIP
Custom hills file naming schema is following: <hill-name>-HS<hs>-<country>.xml
Open this file in the text editor, paste the following content (taken from the Example section), and save the file. This XML code already contains everything you need to create a custom hill - location, weather, inrun and hill profile, etc. No hill constructions are included yet. Also, gate numbers were omitted.
<hill version="DSJ4-1.10.0">
    <location latitude="49.1976" longitude="20.0712" orientation="245" timezone="2" altitude="1300" />
    <weather pollution="0.0" firstsnow="300" lastsnow="90" maxsnow="1.5" precipitationprobability="0.1" fogprobability="0.1" />
    <inrun>
        <profile e="91.5" es="15" t="6.43" gamma="33.5" alpha="10.5" r1="105" s="2.5" b1="2.0" z0="0" l="6.5" f="3.0" />
        <guardrail z1="-1.0" z2="1.0" x="10" />
        <startgate default="8" max="30" step="0.35" wind="2.4" z1="-1.0" z2="1.0" pz1="-0.8" pz2="0.8" t1="Textures\metal.png" m1="Materials\material1.xml" c1="0xaaaaaa" t2="Textures\metal.png" m2="Materials\material1.xml" c2="0x999999" t3="Textures\metal.png" m3="Materials\material1.xml" c3="0x858585" />
        <startbanner z="0" text="TEMPLATE" textsize="0.1" />
        <frame bh="2.0" snow="true" t="Textures\concrete5.png" m="Materials\material1.xml" c0="0x97a594" c1="0xB2ABA0" c="0x504941" c2="0xB2ABA0" />
        <flag x="12.5" z="4.55" hf="1.4" pf="1.5" hp="19.0" rb="0.07" rt="0.05" tf="Textures\flag-pol.png" mf="Materials\flag.xml" tp="Textures\wood1.png" mp="Materials\material1.xml" cp="0xffffff" />
        <twigs lz="1.0" rz="-1.0" />
    </inrun>
    <dhill>
        <profile alpha="6.28" h="62.93" n="107.41" l1="16.04" l2="13.38" a="87.5" beta-p="37.7" beta="34.7" beta-l="32.2" rl="306.15" r2="73.22" b0="9.5" bk="23.37" ba="25" hr="10" nr="60" ar="10" k="120" hs="134" />
        <fence t="Textures\fenceback.png" m="Materials\material1.xml" c="0xffffff" />
        <judgetower d="68.5" q="25.4" h="+4" t1="Textures\wood3.png" m1="Materials\wood.xml" c1="0x78554e" t2="Textures\wood3.png" m2="Materials\wood.xml" c2="0x959183" />
        <lights step="60" size="3" h="30" d="25" r="0.70" g="0.65" b="0.60" attn="0.0005" range="200" t="Textures\rust1.png" m="Materials\metal.xml" c="0x999999" />
        <windflags h="4" l="4.1" d="0.6" t="Textures\rust1.png" m="Materials\metal.xml" c="0x999999" />
        <measurers c1="0x578ad1" c2="0xeeeeee" />
        <label summer-d="75" winter-d="75" text="TEMPLATE" textsize="2.5" />
        <plastic c="0x769391" />
        <lines summer-min="105" summer-max="145" winter-min="105" winter-max="145" />
        <numbers min="50" max="140" />
    </dhill>

    <profile id="inrun-left" side="left" maxstep="1000">
        <start x="-10" y="1.0" refx="inrun" />
        <line x="0" y="1.0" refx="dhill" />
    </profile>

    <profile id="inrun-right" side="right" maxstep="1000">
        <start x="-10" y="-1.0" refx="inrun" />
        <line x="0" y="-1.0" refx="dhill" />
    </profile>

    <terrain>
        <profile in="0.7" a0="5.0" l0="50.0" y0="-15.0" hd="13.5" dd="75.0" sd="30" fd="300" sc="0.07" sm="0.47" rs="1820" c1="0x443920" c2="0x5D603A" tsc="0.008" tsm="0.4" />
        <trees count="10000" minheight="10" maxheight="20" fractalthreshold="0.8" maxaltitude="1600" normalaltitude="1000" seed="142" />
        <blocks count="10" minsaturation="0.0" maxsaturation="0.1" minfloors="1" maxfloors="4" maxaltitude="1300" normalaltitude="1000" fractalthreshold="0.3" seed="258" />
        <houses count="200" minsaturation="0.0" maxsaturation="0.2" minfloors="1" maxfloors="3" maxaltitude="1600" normalaltitude="1000" fractalthreshold="0.5" seed="156" />
        <audience count="500" d="20" x0="0" seed="413" />
    </terrain>
</hill>
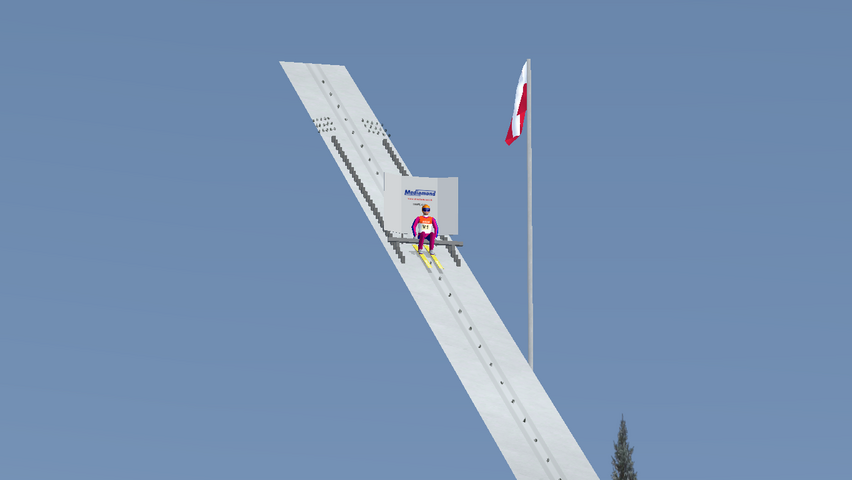
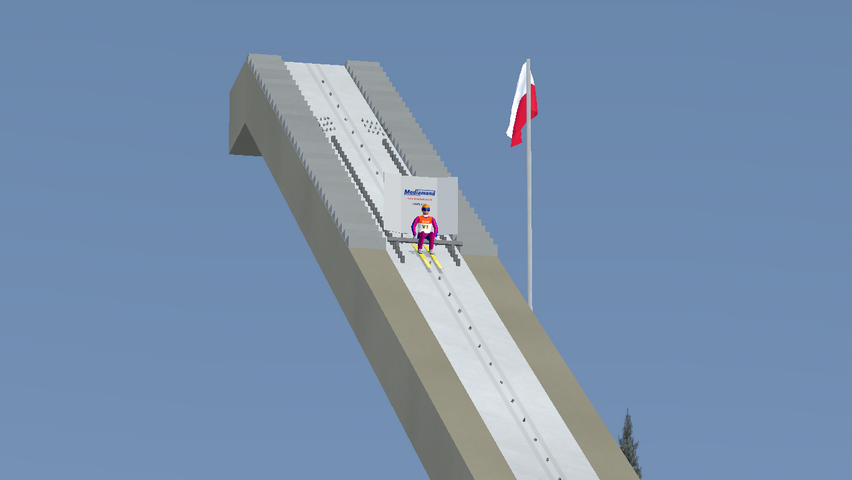
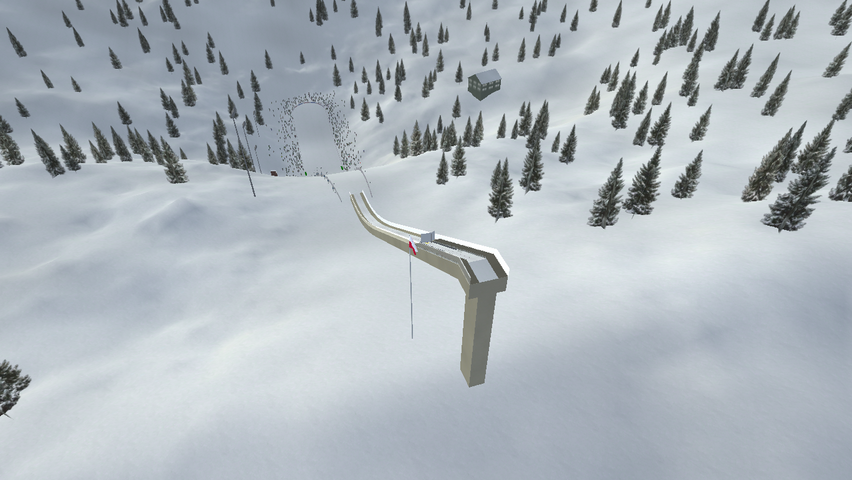
Open DSJ4, go to training mode, and click on Example hill. You should see the following effect.
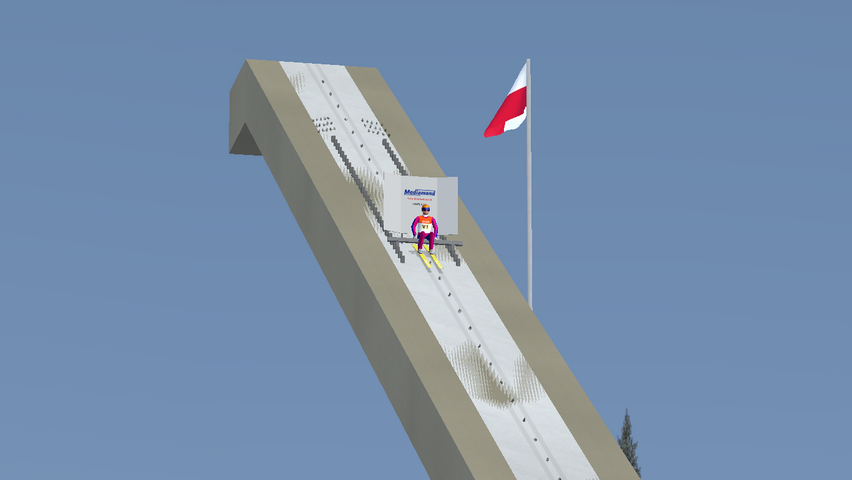
Adding inrun covering
Pretty empty hill, isn't it? Now we are going to add something that will cover some space under the inrun. To your code, before </hill> add
<railing t="Textures\concrete1.png" y="-2.0" c="0xf2e5c7" m="Materials\material1.xml" h="2.0" refx1="inrun" refx2="dhill" w="4.0"/>
What does this snippet mean? You can take a look at the Railings section for attribute explanation. We are creating railing with texture (t) named concrete1.png, material (m) named material1.xml, and color (c) 0xf2e5c7. Its height is two meters (h) and it's placed two meters under the inrun (y). It starts in the inrun (refx1) and ends in the dhill start (refx2). By using refx1 and refx2 attributes we are sure, that this railing will cover the whole inrun profile.
TIP
Materials don't have a big effect on displaying texture.
TIP
You can manually set railing length, delete refx1 and refx2, add refx, and set its value to inrun. Then simply use x1 and x2 attributes and set the beginning and ending position of railing in terms of inrun profile.
Save your file and run your hill again.
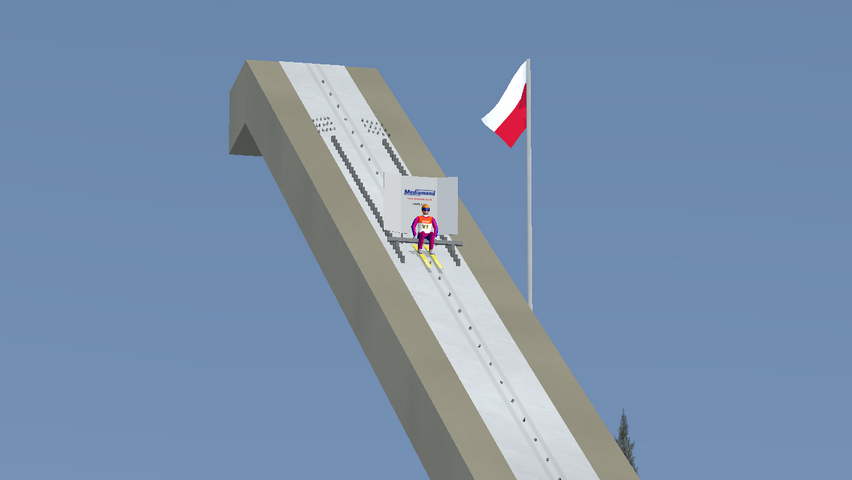
Fixing bugs
You could probably notice one bug - our railing is flickering.
How to fix it? There are a few ways, the most basic is to minimally lower the y attribute value in our railing.
<!-- Before -->
<railing t="Textures\concrete1.png" y="-2.0" c="0xf2e5c7" m="Materials\material1.xml" h="2.0" refx1="inrun" refx2="dhill" w="4.0"/>
<!-- After -->
<railing t="Textures\concrete1.png" y="-2.02" c="0xf2e5c7" m="Materials\material1.xml" h="2.0" refx1="inrun" refx2="dhill" w="4.0"/>
Looks way better.
Adding stairs
Once again, before </hill> add the following snippet.
<stairs refx="inrun" refz="inrun-right" c2="0xe8ebea" m2="Materials\material1.xml" t2="Textures\concrete1.png" c1="0xf2e5c7" m1="Materials\material1.xml" t1="Textures\rubbermat.png" x1="0" x2="20" rz="2" lz="3" />
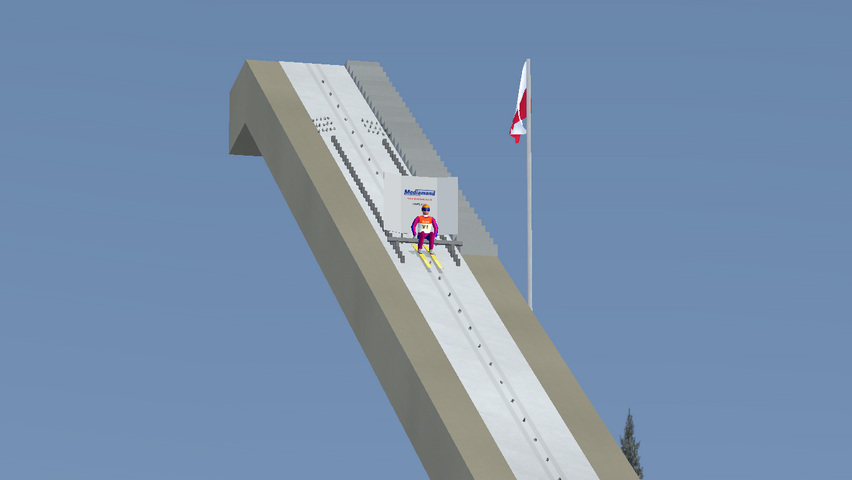
We have added stairs based on the inrun (refx) placed on its right side (refz), starting at the beginning of the inrun (x1) and ending in its 20 meters (x2). By using lz and rz we set stairs width - it's equal to one meter (lz - rz).
Using the same way we can place stairs also on the left side of the inrun.
<stairs refx="inrun" refz="inrun-left" lz="-1" rz="-2" c2="0xe8ebea" m2="Materials\material1.xml" t2="Textures\concrete1.png" c1="0xf2e5c7" m1="Materials\material1.xml" t1="Textures\rubbermat.png" x1="0" x2="20" />
Looks pretty nice.
Covering inrun sides
You probably know these thin, high, and glass elements placed on the inrun.
Now we are going to remake them using the railing element. Once again, before </hill> add the following code snippet.
<railing refx1="inrun" refx2="dhill" type="glass" h="1" w="0.1" z1="2" z2="2" t="Textures\railing-glass.png" m="Materials\window.xml" c="0xffffffff" t3="Textures\railing-glass-cut.png" m3="Materials\window.xml" c3="0xffffffff" t6="Textures\railing-glass-cut.png" m6="Materials\window.xml" c6="0xffffffff"/>
Doesn't look scary. We have added glass railing (t, m, c, t3, m3, c3, t6, m6, c6) that covers the whole inrun (refx1 and refx2). Its height is 1 meter (h), a width of 0.1 meters (w). It's placed on the far left side of the inrun (z1, z2).
Now, how do you think, how can you place this railing also on the right side of inrun?
Inrun pillars
Pillars are an essential part of hill buildings in DSJ4. You can define it as a textured block that can have different shapes. We will add one pillar - under the flat section above the inrun.
<pillar brefy="terrain" trefy="inrun-top" t="Textures\concrete1.png" m="Materials\material1.xml" c="0xf2e5c7" reflz="inrun-left" refrz="inrun-right" x1="0" x2="3" />

What happened here? We have added the pillar. Its basis starts on terrain (brefy) and ends on inrun top (trefy). By adding refrz and reflz we have added all required shape sides. Its length is 3 meters (x2 - x1). We didn't have to manually adjust pillar height - it's determined by refs.
TIP
Try to remove refrz and reflz and see the effect.
Turn on the F10 camera. Oops, flickering again.
We will remove the top pillar side.
<!-- Before -->
<pillar brefy="terrain" trefy="inrun-top" t="Textures\concrete1.png" m="Materials\material1.xml" c="0xf2e5c7" reflz="inrun-left" refrz="inrun-right" x1="0" x2="3" />
<!-- After -->
<pillar brefy="terrain" trefy="inrun-top" t="Textures\concrete1.png" m="Materials\material1.xml" c="0xf2e5c7" reflz="inrun-left" refrz="inrun-right" x1="0" x2="3" top="false" />
Final code
<hill version="DSJ4-1.10.0">
    <location latitude="49.1976" longitude="20.0712" orientation="245" timezone="2" altitude="1300" />
    <weather pollution="0.0" firstsnow="300" lastsnow="90" maxsnow="1.5" precipitationprobability="0.1" fogprobability="0.1" />
    <inrun>
        <profile e="91.5" es="15" t="6.43" gamma="33.5" alpha="10.5" r1="105" s="2.5" b1="2.0" z0="0" l="6.5" f="3.0" />
        <guardrail z1="-1.0" z2="1.0" x="10" />
        <startgate default="8" max="30" step="0.35" wind="2.4" z1="-1.0" z2="1.0" pz1="-0.8" pz2="0.8" t1="Textures\metal.png" m1="Materials\material1.xml" c1="0xaaaaaa" t2="Textures\metal.png" m2="Materials\material1.xml" c2="0x999999" t3="Textures\metal.png" m3="Materials\material1.xml" c3="0x858585" />
        <startbanner z="0" text="TEMPLATE" textsize="0.1" />
        <frame bh="2.0" snow="true" t="Textures\concrete5.png" m="Materials\material1.xml" c0="0x97a594" c1="0xB2ABA0" c="0x504941" c2="0xB2ABA0" />
        <flag x="12.5" z="4.55" hf="1.4" pf="1.5" hp="19.0" rb="0.07" rt="0.05" tf="Textures\flag-pol.png" mf="Materials\flag.xml" tp="Textures\wood1.png" mp="Materials\material1.xml" cp="0xffffff" />
        <twigs lz="1.0" rz="-1.0" />
    </inrun>
    <dhill>
        <profile alpha="6.28" h="62.93" n="107.41" l1="16.04" l2="13.38" a="87.5" beta-p="37.7" beta="34.7" beta-l="32.2" rl="306.15" r2="73.22" b0="9.5" bk="23.37" ba="25" hr="10" nr="60" ar="10" k="120" hs="134" />
        <fence t="Textures\fenceback.png" m="Materials\material1.xml" c="0xffffff" />
        <judgetower d="68.5" q="25.4" h="+4" t1="Textures\wood3.png" m1="Materials\wood.xml" c1="0x78554e" t2="Textures\wood3.png" m2="Materials\wood.xml" c2="0x959183" />
        <lights step="60" size="3" h="30" d="25" r="0.70" g="0.65" b="0.60" attn="0.0005" range="200" t="Textures\rust1.png" m="Materials\metal.xml" c="0x999999" />
        <windflags h="4" l="4.1" d="0.6" t="Textures\rust1.png" m="Materials\metal.xml" c="0x999999" />
        <measurers c1="0x578ad1" c2="0xeeeeee" />
        <label summer-d="75" winter-d="75" text="TEMPLATE" textsize="2.5" />
        <plastic c="0x769391" />
        <lines summer-min="105" summer-max="145" winter-min="105" winter-max="145" />
        <numbers min="50" max="140" />
    </dhill>

    <profile id="inrun-left" side="left" maxstep="1000">
        <start x="-10" y="1.0" refx="inrun" />
        <line x="0" y="1.0" refx="dhill" />
    </profile>

    <profile id="inrun-right" side="right" maxstep="1000">
        <start x="-10" y="-1.0" refx="inrun" />
        <line x="0" y="-1.0" refx="dhill" />
    </profile>

    <terrain>
        <profile in="0.7" a0="5.0" l0="50.0" y0="-15.0" hd="13.5" dd="75.0" sd="30" fd="300" sc="0.07" sm="0.47" rs="1820" c1="0x443920" c2="0x5D603A" tsc="0.008" tsm="0.4" />
        <trees count="10000" minheight="10" maxheight="20" fractalthreshold="0.8" maxaltitude="1600" normalaltitude="1000" seed="142" />
        <blocks count="10" minsaturation="0.0" maxsaturation="0.1" minfloors="1" maxfloors="4" maxaltitude="1300" normalaltitude="1000" fractalthreshold="0.3" seed="258" />
        <houses count="200" minsaturation="0.0" maxsaturation="0.2" minfloors="1" maxfloors="3" maxaltitude="1600" normalaltitude="1000" fractalthreshold="0.5" seed="156" />
        <audience count="500" d="20" x0="0" seed="413" />
    </terrain>

    <railing t="Textures\concrete1.png" y="-2.02" c="0xf2e5c7" m="Materials\material1.xml" h="2.0" refx1="inrun" refx2="dhill" w="4.0"/>

    <stairs refx="inrun" lz="2" rz="1" c2="0xe8ebea" m2="Materials\material1.xml" t2="Textures\concrete1.png" c1="0xf2e5c7" m1="Materials\material1.xml" t1="Textures\rubbermat.png" x1="0" x2="20" />
    <stairs refx="inrun" lz="-1" rz="-2" c2="0xe8ebea" m2="Materials\material1.xml" t2="Textures\concrete1.png" c1="0xf2e5c7" m1="Materials\material1.xml" t1="Textures\rubbermat.png" x1="0" x2="20" />

    <railing refx1="inrun" refx2="dhill" type="glass" h="1" w="0.1" z1="2" z2="2" t="Textures\railing-glass.png" m="Materials\window.xml" c="0xffffffff" t3="Textures\railing-glass-cut.png" m3="Materials\window.xml" c3="0xffffffff" t6="Textures\railing-glass-cut.png" m6="Materials\window.xml" c6="0xffffffff"/>
    <railing refx1="inrun" refx2="dhill" guard="false" type="glass" h="1" w="0.1" z1="-2" z2="-2" t="Textures\railing-glass.png" m="Materials\window.xml" c="0xffffffff" t3="Textures\railing-glass-cut.png" m3="Materials\window.xml" c3="0xffffffff" t6="Textures\railing-glass-cut.png" m6="Materials\window.xml" c6="0xffffffff"/>

    <pillar brefy="terrain" trefy="inrun-top" t="Textures\concrete1.png" m="Materials\material1.xml" c="0xf2e5c7" x1="0" x2="3" refrz="inrun-right" reflz="inrun-left" top="false" />
</hill>
What's next
That's all! You have the nicely looking K120/HS134 hill will basic constructions. Now it's your time. Play around with all attributes and parameters - you can find the reference for them in the documentation. Copy elements from already existing hills and see how they are working.
Happy coding!